Monday, September 22, 2014

REMINDER: Around the World Blog Hop

Just a reminder to hop on over to see my friends Kim (Brigantia Designs) and Jean (All Points on the Compass), as they take their turns on the Around the World Blog Hop!

Here is what I wrote about each of them when I invited them to the Hop last week:

First up is Kim, who lives in the UK. Kim has a way with HSTs like nothing you have ever seen. Perfect every time! Her love of them may be the only way that we are not exactly alike. And the bags she makes? Insanely beautiful. We have children of similar ages, we both run, we both love wine and bread and chocolate. I mean really, what more could you ask for in a friend? We often talk about getting together to sew or chat or run or eat and though I certainly wish she lived on my side of the Atlantic, I can imagine it might be dangerous for us to spend too much "real life" time together. The trouble I know we'd get into! Kim blogs over at Brigantia Designs so be sure to stop by and see her!
Next up is Jean who writes over at All Points on the Compass. She lives all the way in New Zeland and though I understand how geography and climate work, it still amazes me that she has snow when the place I live (South Florida) is in the dead of summer. Jean has so much spunk, I don't know how she does it. I "met" Jean when I was going through a pretty dark time and she was so kind to me with words and deeds that she will always hold a special place in my heart. You MUST see her photography. I aspire to someday have the eye and talent she has for capturing just THE most amazing pictures.

~*~ May your day be full of Love and Ladybug Hugs ~*~
Thanks for stopping by!
~ Kat ~

Monday, September 15, 2014

Around the World Blog Hop

A big thank you to my sweet friend Nancy over at Pug Mom Quilts for inviting me to join the Around the World Blog Hop. This is my first every hop so I'm really excited to participate! This blog hop is like a giant chain letter that won't end until every Blogger on the planet has had a turn. How fun, don't you think?

If you've never stopped by before, welcome! And if you have, thanks for coming back. Friends are always welcome around these parts -- both the ones I've known forever and the ones I've yet to meet.

Before I answer the questions, I have to tell you a little bit about Nancy. What a talented lady she is! She not only has ONE beautiful quilt for her bed, but she has enough to swap them out monthly and still not get through them all. (I may or may not be a wee bit jealous about this... but I love her so it's all good.) She is involved with many different quilt groups and swaps and no matter what she's making or who she's making it with, she always seems to be having a blast (and usually eating some chocolate --- a girl after my own heart)!   Nancy is also mommy to 3 of the cutest little boys I've ever seen --- her little pugs Larry, Elvis and Romeo. You really need to swing by her blog to check out her beautiful work and her little sweethearts, too!

~*~*~*~*~*~*~*~*~*~*~*~*~*~*~*~*~

Now on to my questions. Drum roll, please!

1. What am I working on?
Like most quilters, I have a whole slew of WIPs, all in various stages of completion.  Some are just ideas in my head, some are cut and waiting for me to begin, some could be completed with an hour or two of work.  Sound familiar?  What I should be working on right now is sandwiching, quilting and binding a flimsy that has been hanging over my stair rail for at least 6 months. What I'm actually working on is trying to pull together a bunch of small, simple items that I can mass produce and sell at my first ever vendor fair. My older daughter is in the band at school and they are doing a fundraiser for an upcoming trip to play at Disney World (how cool is that?!?!). The price for a space seemed very reasonable so I'm working frantically to create enough items ready to set up a respectable table. I want to keep the price points very low (it's a school / family event) so I'm experimenting with things I can make quickly and easily from stash materials. I'm calling them my "Sew Super Simples."  Here are photos of a few things I've made so far, but check back for updates on my progress!

Sew Super Simple: Dish towel sets with cookbook weight
I've made 12 sets of these in different colors and holiday prints.  I'm adding a cute set of heart-shaped measuring spoons, which are left-over favors from my sister's bridal shower 4 years ago.
 
 
Sew Super Simple: Little zippy pouches
These finish at 4" x 6", a great size for phone, cash, keys, earbuds, iPod, gift cards, etc.
 
 
Sew Super Simple: ID Lanyards
The middle schoolers are required to have their school ID visible at all times, so I think these will be popular.  I'm experimenting with different rings/tags to clip the IDs on to the bottom.
 

2. How does my work differ from others of its genre?
I'm very glad to be answering this question, actually, because it took me a long time to come to terms with it. I spend a lot of time reading other quilting / crafting blogs and wowsers! There are some incredibly talented people out there who make things more beautiful than I could ever imagine. Gorgeous fabrics, perfect seam allowances, fancy FMQ, drool-worthy photos. I admire each and every quilter I come across for one reason or another. But, seeing all the "perfect" stuff out there --- while inspiring --- is also incredibly intimidating. What I used to think was pretty nice stuff (that I made) paled in comparison to so many other beautiful things I saw in the blogosphere. And it was discouraging. I tried to replicate, emulate, duplicate, you name it, usually with little success. Then it finally hit me.  That's not me. I don't always use designer name fabric, or the newest lines or the most recent patterns. Heaven knows my photography and photo editing skills pretty much stink.  But that's OK!!!  Don't get me wrong... from time to time I make something just because I like the fabric or want to try a new technique or pattern... but I'd say 90% of the things I make are made very specifically for the recipient. They're personalized --- either by color, fabric, pattern, hand stitched tags --- something that's very personal to the person who will receive it. It's OK that not every stitch is perfect or that every seam is straight. And honestly, the person's neighbor might hate it... but that's because it's made with love and ladybug hugs for the person who will receive it --- and it will be evident to that person that it was made specifically for them and only for them.  I love beautiful quilts and bags and there are definitely times I want to make something solely to make something beautiful, but with limited time (a full time job, 2 kids, training for races, etc), I tend to stick to very "purposeful" items... and I'm OK with that.  Here are a few photos of personalized items I've made:

Mickey Irish Chain for Luanne
This was a thank you gift for a dear friend who happens to love Disney.  The center blocks have Mickey Mouse and the red fabric has Mickey heads on it. 
 
 
Aaron's Pond Pals
This was a baby gift for my nephew.  I personalized it by embroidering his name and birth stats into the sun (photo below).
 
 
I made this up as I went along, it's the only quilt I've ever made for myself.  Each block / shape / color represents a very important part of my life. 
 
 
Baby Megan's Quilt
This was made for my niece, personalized with her birth stats (see below).  The white fabric with the flowers and ladybugs is a crib sheet that matched her nursery bedding.
 
 
Paula's Purples
This quilt was made for my husband's second cousin (who loves purple and peace signs). 
 
 
You Can't Outgrow Memories
My dear friend Rita (on the left) gave me some dresses she had made for her daughters 35-40 years ago.  She saved them all these years, in case she had a granddaughter one day.  When the granddaughter came along, she realized the dresses were outdated and thought I could use the fabric for charity quilts.  I cut up the dresses to make the hearts for this quilt (we have a shared love of hearts) and gave it back to her for Christmas.  She loved it!
 
 
3. Why do I create what I do?  ~and~
4. How does my writing / creating process work?
These questions seemed a bit similar so I decided to combine the answer.  I think I'd definitely refer to my style as MUGA --- Making it Up as I Go Along.  Like I mentioned above, I usually start a project with a specific person or purpose in mind.  I think about what that person might like (color, pattern, fabric, etc) then do some internet and stash searching for ideas.  Once I find an idea I like, I try to determine the easiest way to make it (without a pattern) and just start cutting and sewing and piecing.  Once in a while there is math involved (usually not much) and once in a while it turns out like I'd hoped.  Often it doesn't but that's still OK.  The fact that the item is personalized lets the recipient know it was made just for them, even if it doesn't look like the picture in my head.  That's the other good thing about not using patterns --- no one but me knows what it was supposed  to look like in the first place!  In addition to making items (quilts, bags, etc) for family and friends, I try as often as possible to make items for friends of friends (especially children) going through hard times.  I make a lot of items to be donated but as with my "regular" projects, I usually know a bit about the recipient as I make the quilt. Here are a few examples:


I made this recently for a 13-year-old undergoing chemo. Her motto is "YOYO" (You're Only Young Once) and her favorite colors are purple and blue. I've always wanted to try a bagello quilt so I used my MUGA method on this one. I think the "waves" symbolize the ups and downs she's had on her long road toward a full recovery.


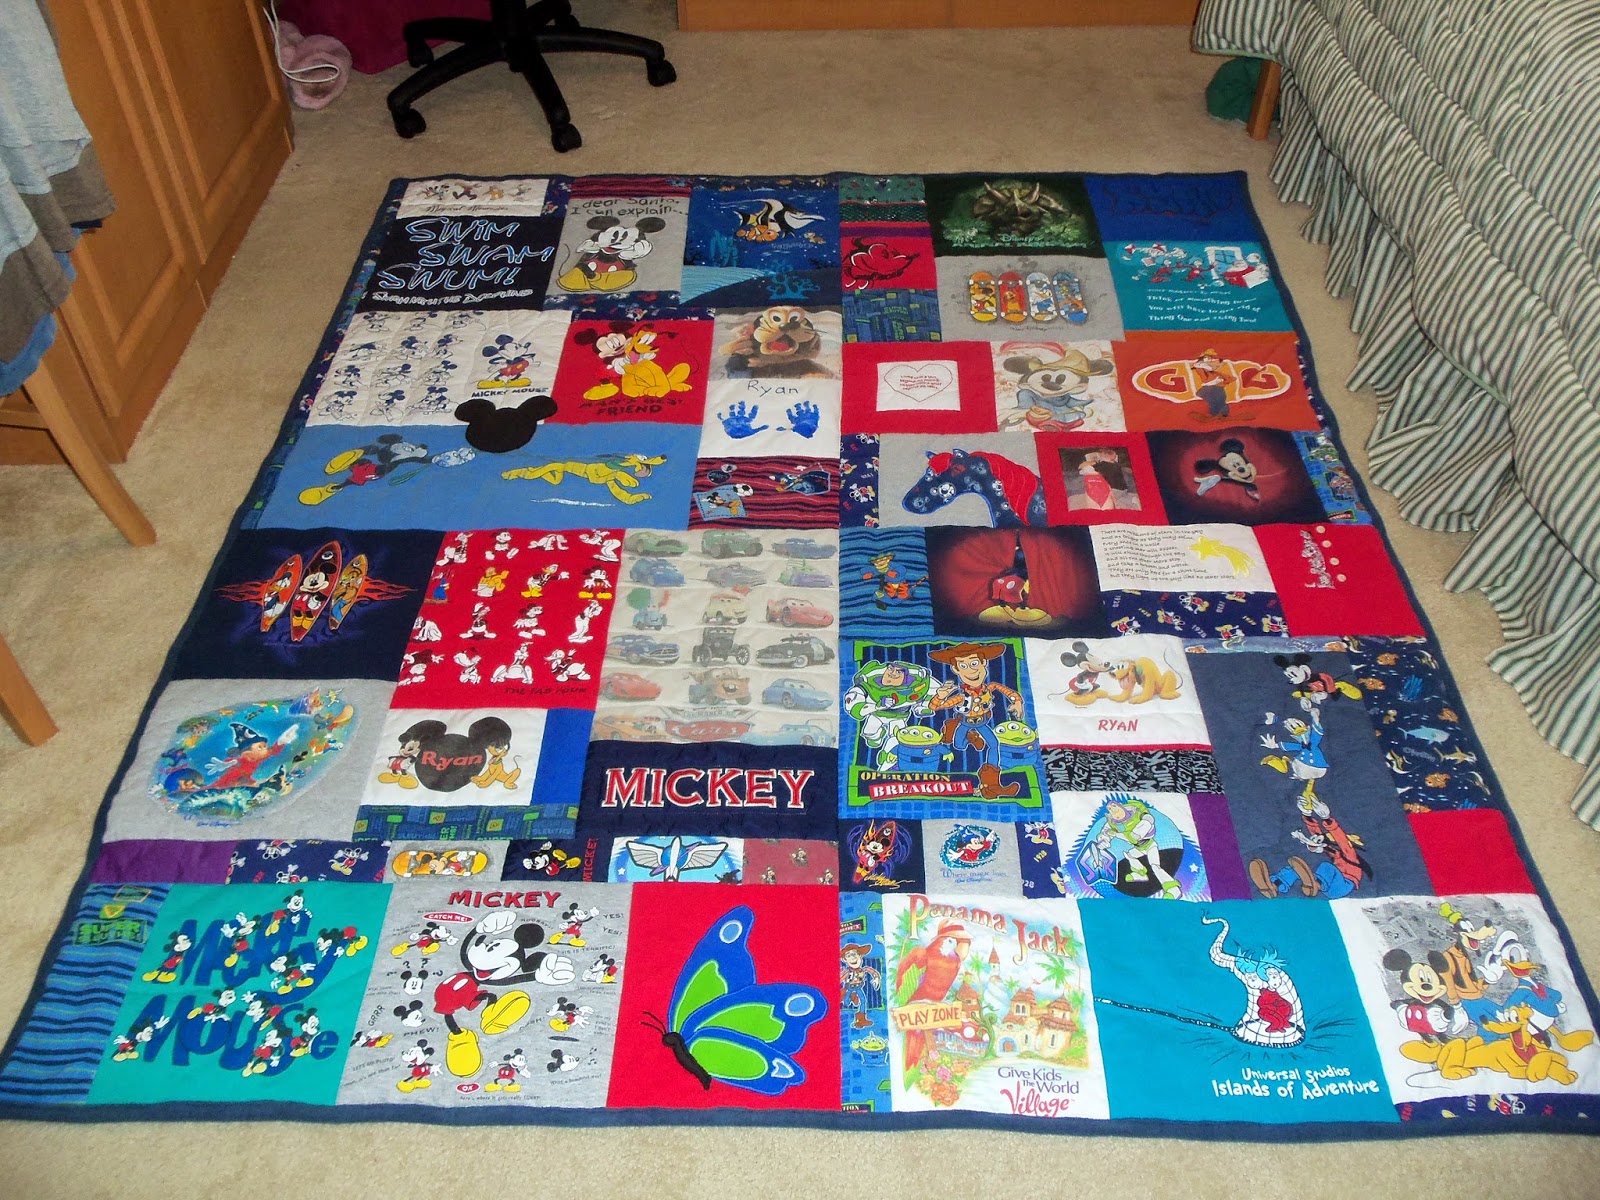
Made with Love for Ryan
This was made for a woman who lost her 9 year old son a few years back.  Every block is made from his clothes.  He loved Disney so that was the theme, with a few personalized (stitched, photo and applique) blocks added in at her request.  For example: At his funeral, buterflies were released, so she asked me to include a butterfly.  Toward the center of the bottom row is a blue & green butterfly on a red background.  I made that (applique) using pieces of his clothing.


Cars for Tyler
I made this quilt several years ago for a little boy undergoing chemo for brain cancer. Cars was his favorite movie at the time and I think there's something so special about a child having their own name on their own quilt.


Minnie Mouse for Sophia
My friend Rachel asked me to make a Minnie Mouse quilt for her niece. I couldn't find much Minnie fabric, so I made those Minnie heads (with the bows) myself (applique). I added Sophia's name in Disney font (also applique) to personalize it more.
 
~*~*~*~*~*~*~*~*~*~*~*~*~*~*~*~*~

I'm now going to invite two other blogging friends to join the Hop next week.  In the spirit of "Around the World," I picked two lovely ladies that definitely are around the world from me!

First up is Kim, who lives in the UK.  Kim has a way with HSTs like nothing you have ever seen.  Perfect every time!  Her love of them may be the only way that we are not exactly alike.  And the bags she makes?  Insanely beautiful.  We have children of similar ages, we both run, we both love wine and bread and chocolate.  I mean really, what more could you ask for in a friend?  We often talk about getting together to sew or chat or run or eat and though I certainly wish she lived on my side of the Atlantic, I can imagine it might be dangerous for us to spend too much "real life" time together.  The trouble I know we'd get into!  Kim blogs over at Brigantia Designs so be sure to stop by and see her!
 
Next up is Jean who writes over at All Points on the Compass.  She lives all the way in New Zeland and though I understand how geography and climate work, it still amazes me that she has snow when the place I live (South Florida) is in the dead of summer.  Jean has so much spunk, I don't know how she does it.  I "met" Jean when I was going through a pretty dark time and she was so kind to me with words and deeds that she will always hold a special place in my heart.  You MUST see her photography.  I aspire to someday have the eye and talent she has for capturing just THE most amazing pictures.

Happy hopping, everyone! 
 
~*~*~*~*~*~*~*~*~*~*~*~*~*~*~*~*~
~*~ May your day be full of Love and Ladybug Hugs ~*~
Thanks for stopping by!
~ Kat ~

Monday, September 8, 2014

Bright on White: Wonky(ish) Stars


while back I challenged myself to use some BRIGHT colors on a quilt with a white background.  I'd seen so many beautiful "bright on white" quilts but it was so far out of my comfort zone that I just hadn't tried it.  I made a few blocks (probably a year ago?) and they waited patiently on my design wall for their friends to be born.
 
 
A few weeks ago I decided I needed to do something about my WIPs.  "Bright on White" wasn't necessarily the first thing on my list but when I realized all the squares were already cut, it seemed like the way to go.  Once I got started it didn't take much time to put the rest together.  There are 2 each of 2 different pinks, purples, greens, yellows and blues, for a total of 20 blocks that finish around 12" each.  These are the additional blocks (2 of each shown) I made, to join the 6 already on my design wall.
 
 
As with most of my projects, I let my daughters lay out the blocks. I am way too OCD about these things, it usually takes me more time to come up with a "random" block placement than it does to make the blocks. I didn't realize until the quilt was finished that there are 3 blues in a diagonal line... but I think that's still OK.
 
 
I added another colorful border, then one last border of white. The binding is a pink floral print. I forgot to measure the finished size, but I'm guessing about 58" x 70".
 
 
The backing is pieced from my stash. Most of the fabrics are polka dots, with the exception of the upper left (biggest) green piece. That has tiny colorful swirls on it that mimic polka dots and incorporate all the colors from the front.


I quilted with an all-over, large-scale meander in white thread.  The binding is a small pink floral.


When I started this quilt it was just to challenge myself, I didn't have a recipient in mind.  (That's rare for me, and probably why it took me so long to finish!)  The week I was working on it happened to be the birthday of one of my daughter's best friends.  Rachel (my daughter) declared that Morgan was such a good friend, she deserved more than a gift card for her birthday --- she deserved a quilt.  Can't argue with that!


My daughter wrote the message above and I stitched it onto one of the stars.  Now Morgan will always have a "hand written by Rachel" reminder of how special she is!
 
I've recently started adding tags to my quilts with care instructions on the back. I make these using Avery business cards and my home computer.
 
 
All wrapped up and ready to go!
 
 
The beautiful Miss Morgan (left) and my daughter Rachel. I think she liked it!


~*~ May your day be full of Love and Ladybug Hugs ~*~
Thanks for stopping by!
~ Kat ~

Tuesday, August 19, 2014

Quilt Display

I've long admired photos of quilts displayed in a home hanging over the rungs of an old ladder and wanted to do something similar. Two problems, though --- I didn't have an old ladder, and most of the quilts I make are gifted, they're no longer hanging around my house.

Lately I've started making some quilts (and bags) just because, so I had a few starting to pile up. (As it turns out, I did have a few hanging around my house in various places, as well.  Who knew??) Last week, I saw an idea on Facebook (wish I could remember the original source to link back, but I can't) about using part of a baby crib to display quilts. Well it just so happens, I have one of those!

This weekend's project was to organize my younger daughter's room. The space under her bed was not usable because our old crib (not used in over 6 years) was in pieces underneath. The back of the crib serves as my daughter's headboard but I always thought that someday if we re-did her room (new furniture), I would donate the crib to Goodwill. Turns out the kind of crib we had (with the front that slides up and down) is no longer considered "safe" in the US, and she's still using the same headboard. So.... she keeps the back for her headboard, I keep the front for my quilts, and everthing in the middle is purged. She has space under her bed for storage, and I have a display rack for my quilts!
 
Quilts down the middle, a pillowcase on the bottom and some bags on the sides.  The 2 bags on the right and the bottom quilt were stashed in my craft closet since I can't even remember when.  Right now, this is leaning up against the armoire in my bedroom but I plan to move it to a different spot after a room makeover I'll be doing in the next few weeks.
 
 
I saw a different post on Facebook that suggested organizing handbags in your closet by attaching them to shower curtain rings on your closet bar.  I bought a 12-pack of clear curtain rings for about $3.00 and Voila!  Bag hangers!
 
 
I know I've blogged about the bottom quilt.  Not sure I've shown photos of the top two or the bag on the left.  Maybe one of these days :-).


~*~ May your day be full of Love and Ladybug Hugs ~*~
Thanks for stopping by!
~ Kat ~

Thursday, August 14, 2014

Hipster Prototype

In about 11 weeks, I'm going to be running another one of those crazy 200 mile relay races (from Chattanooga to Nashville, Tennessee). It's tradition that I make a little "something" for my team mates. In the past it has always been little demin zippered pouches with the race logo on them, but I wanted to try something a little bit (but not too much) different this time. (Here is what the first ones looked like --- don't think I ever blogged about the 2nd batch, but they were way cuter... whoops!)   I thought a small over-the-shoulder hipster bag would be nice, but I couldn't find a pattern or tutorial that was quite what I wanted. What's a sew-er to do? Make my own, of course!

I didn't want to waste any "good" fabric, so I used some home decor weight blah green, which was left over from lining my dining room curtains about 10 years ago. I'm not even sure where the green print came from. I used zippers I didn't love and didn't make the strap adjustable on this one (why waste good hardware on a bag I won't use, right?). I made it up as I went along and only had to rip one seam. Much to my surprise, it came out exactly how I envisioned it. Woo hoo! Or course, that "woo hoo" is followed by a big fat "darn!" becuase now I wish I'd made it prettier. It functions perfectly but it's just to stinkin' ugly! Oh well... things could worse.

 
It measures 7" tall, is 6" across the bottom, 8" across the top and is 2" deep. It has a fully lined outside zipper pocket (perfect size for my phone), a fully lined main compartment and a dropped-zipper in the top.

 
On the "real" version, I plan to make the strap adjustable and add an inside pocket. The outside will also be prettier. I can see these with so many color combinations, with embellishments, patchwork... the choices are endless!


I took notes as I went, I just need to get them written up in a little more organized way, so I actually understand what all my chicken scratch means when I am ready to make the next one. Who am I kidding, I'm ready NOW!!!! Alas, the repair shop called to say my Viking is ready for pick-up, so I have to figure out what to do next.
 
Finish quilting this?
 
 
Start quilting this?
(Yup, WIPs live with Legos in my house.... that's how we roll around here!)
 
 
Do SOMEthing with these?


Write myself a pattern for this new bag.... make more of these new bags?

Decisions, decisions...


~*~ May your day be full of Love and Ladybug Hugs ~*~

Thanks for stopping by!
~ Kat ~

Wednesday, August 13, 2014

Baby Clothes Quilt for Jack

What is it with me and memory quilts? I love saying "yes" when friends ask me to make them, but I can't seem to get my act together to actually finish them for years. Yes, years. Shame on me!
 
 
Shannon sent me a box full of her son's baby clothes well over 2 years ago (probably closer to 3). I put them into my craft closet and you know what they say --- out of sight, out of mind. This quilt only took 8 or 10 hours to complete (once I finally got started).... it's getting started I can't seem to get very good at!
 
The clothes she sent ranged in size from newborn to about 24 months, so the sizes varied greatly.  She also included a few burp clothes (which were great for filling in "blank" spaces) and one itty bitty little bib.  There were t-shirts, sweatshirts, terrycloth, fleece and nylon items.  They all got a layer of fusible interfacing on the back (Pellon lightweight) before I cut them to size.  The size and layout of the quilt was dictated completely by the clothes!
 
Here are a few of my favorites:
 
This happy little crab was on the side of some nylon swim trunks.
 
 
I saved the Harley Davidson tag from the inside of a little fleece jacket and sewed it in the upper left corner of the gray block.  A cute little 3-D effect, I think.
 
 
The center part of this block was a tiny little bib, round at the bottom.  I had to improvise (with pieces from a matching onesie) to bring it up to a block size.
 
 
I really wanted to use the Calvin Klein logo from this shirt, but it was in an odd spot to cut out, so I just used the shirt with the buttons, pockets and all.  I sewed the main opening closed (down the middle), but it still looks functional.
 
 
Here's another little shirt I left in tact (right).  I was short by one block so I added a "J" (made from the Calvin Klein shirt, above) to a gray square cut from the back of another onesie.
 
 
This was from a tiny little swim shirt that went with the itty bitty swim trunks.  So adorable!
 
 
I was so excited to have this completed and (finally) in the mail that I didn't take any pictures of the back.  You're not missing much, though... I just used plain black fleece.  I stitched in the ditch on every seam between all the blocks.  I used cotton batting in the middle, because I don't think I could have gotten it through my machine (fleece + thicker batting + sweatshirts in some of the top blocks + interfacing) otherwise.  I sewed the entire thing (piecing and quilting) with my walking foot.  What a difference that made in the assembly!  On all the previous t-shirt quilts I've made, I just used a regular foot for piecing.  Never again --- the walking foot makes a night and day difference!
 
This little guy measures 54"x32" after washing.


~*~ May your day be full of Love and Ladybug Hugs ~*~
 
Thanks for stopping by!
~ Kat ~

Friday, August 8, 2014

You're Only Young Once


I spent the month of July in Upstate New York with my family and friends.  It was there, through dear family friends, that I learned Reese's story.  Reese is a beautiful, courageous 13 year old girl.  Reese is battling cancer.  Though her latest surgery results show success (clean margins!), she will be undergoing chemo until at least March of next year.  When my friends asked if I could make her a quilt, I couldn't say no!


I started working as soon as I got home.  I didn't have much to go on.... all I knew was that her favorite colors are blue and purple, and her motto is YOYO -- You're Only Young Once.


I made this up as I went along, going for a bargello-ish style.  Not much went as planned along the way, both in good ways and bad, but I have to say (and I don't say this often), I *LOVE* how this turned out.


The quilt finishes at 55" x 72" and it used 7 yards (!!!!) of fabric for the front.  I bought 14 
half-yard cuts (7 blue, 7 purple) and expected to have strips left, but all those seams ate it right up.  I had enough left to do a scrappy binding, though, so it worked out perfectly in the end.


My original plan was to FMQ this, but my new machine is acting up (again!) so I had to settle for straight line stitch-in-the-ditch with my walking foot on my old Singer.  In hindsight, I think this was the perfect (forced) option.  The back is a solid teal blue.


I managed a little FMQ around the letters, which are adhered with Heat 'n Bond Lite.  My swirls are not perfect but for the first time ever, I'm actually OK with that.  


The color is a bit off in this last photo, but it shows more detail of the FMQ around the letters, from the back of the quilt.  

(I should have fluffed this quilt in the dryer one more time before taking the pictures... it sat in there overnight and I didn't realize how many wrinkles there were from sitting in a ball until I uploaded these photos.  Oh well, live and learn!)

I hope that Reese will love this quilt and will feel the Love and Ladybug Hugs every time she curls up with it.  Praying for her speedy, fully recovery!


~*~ May your day be full of Love and Ladybug Hugs ~*~

Thanks for stopping by!
~ Kat ~